Tuesday, March 18, 2014
Building Showcase - Ancient Aztec Houses
Hello, I'm N8thanH, and welcome back to Across the Map!
A while ago, I did a post where I decorated an Ancient Aztec noble's house, and I promised a tour of the other houses. I realize it has been a while, but today, we're going to go on said tour!
I think that the best plan is to start at the smaller houses, since they won't take as long to tour as the noble's house. So, here is the first house I built; a basic hut.

The house is pretty plain on the outside, but on the inside, we have a tightly packed little room! It is fitted with a table, some sleeping mats, and an oven (I made a glitch furnace using MCEdit).

I didn' show the furnace in the above image, so this is the furnace in case you were curious.

As you can see, the Tile Data of the furnace is improperly set, so the furnace appears to be lit, but in the GUI, the furnace is indicated to be inactive. (Hey, I got to kill two birds with one stone, and show you guys my Furnace GUI texture! :D )

Religion was very important to the Aztecs, so each room in each house has a shrine. But, since Minecraft doesn't have many options for blocks for the shrines, they ended up looking kind of ridiculous.

Another common house feature was a steambath. The doctors found them to be healthy, so many people had them built outside their homes.

The Steambaths are actually quite simple! They would light a fire inside, then pour water on the wall to heat it up, so I added a fireplace, even though it really doesn't help in Minecraft. Well, if you're going to do something, you may as well do it the way it's meant to be done: in my case, with a fireplace!

I used some cobwebs to make pretend steam. I saw this on a video somewhere. Why not make a spider's day for a change? :D

Um, yeah...

Next up, we have a more unusual lot: a Chinampa, AKA Floating Farm!
These things are literally a farm floating on a lake. The Ancient Aztecs used to lay down lake mud on a lake, and grow willow trees on it, so the roots of the trees would quickly grow and hold together the farm bed.

I did try to build some small Willow trees. Hand-crafted plants are sort of a lost art in this game.

This house is quite crammed! But still, religion was important enough to the Aztecs that they would always have a shrine.
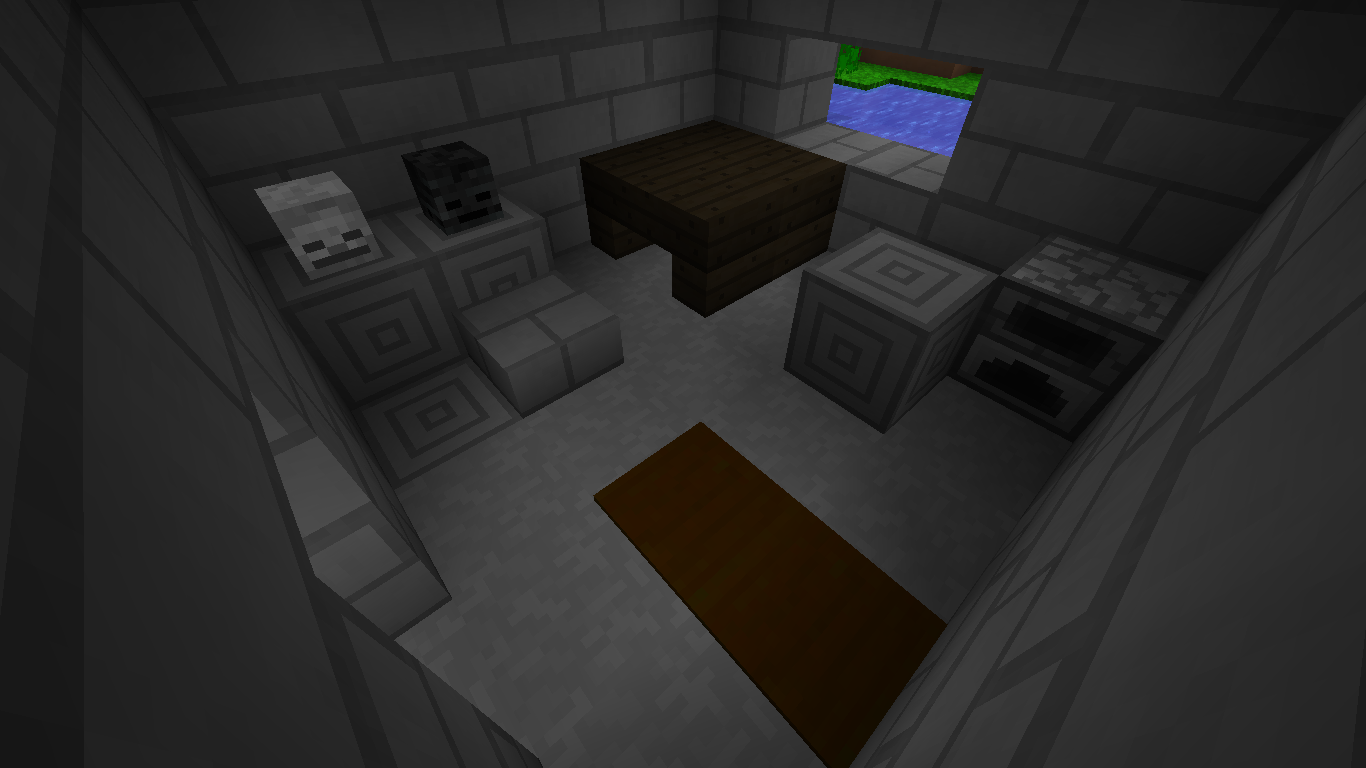
In here, there is some storage. I'm not sure if they actually had something like this storage room, but none of the web sources I could find had any details on what they would build on the Chinampas, so this was my best guess. Also, a guy has to keep his tools somewhere, and you know me and how I am a chestaholic, and this is the result.

Finally, here is the Noble's House. I'm right in front of the entracne.
Once again, I couldn't find any specific information on the architecture of the homes of the Nobles, so this house is largely based on a Mexican house I've seen before.

Anyway, here are the rooms! I didn't want to do too long of a post today, so down below are pictures of all the unique* rooms. Here we go!
But first, let's call it time for the Impromptu Random Bonus Screenshot of the Week!
In today's photo, we have a very random Spider Jockey.

My caption: that awkward moment when a Spider Jockey holding an enchanted bow decides to climb into your back window...
First of all, heading to the right at the front entrance, we have the dining room. Yes, the Aztecs actually would sit on blocks of stone.<3

Next room down the right side of the house is the Kitchen.

Last on this end of the house are the servant quarters. The Nobles did have several servants!

We have reached the end of that part of the house, so let's head down the other end.
Immediately to the left are the Men's and Women's Reception Rooms (they appear in that order, going down the left stretch). This is where the residents would entertain their guests!


Right after that, we hit the master bedroom...

...and then *a whole TON of minor bedrooms! This is only one photo! XP <- (Dead face)

Down below, all the orange-highlighted area is filled with bedrooms.

The final room on this end of the house is a nursery. (Yes. The crib may be horribly historically inaccurate. :p)

Last but far from least, we have the outdoor garden! Here it is, along with the Wacky Water God! (Remember him? :) )

Well, that's it for this week. If you have any suggestions, I would really appreciate them, and thanks for stopping by my blog!
I'll see you all next post Until then!
A while ago, I did a post where I decorated an Ancient Aztec noble's house, and I promised a tour of the other houses. I realize it has been a while, but today, we're going to go on said tour!
I think that the best plan is to start at the smaller houses, since they won't take as long to tour as the noble's house. So, here is the first house I built; a basic hut.
The house is pretty plain on the outside, but on the inside, we have a tightly packed little room! It is fitted with a table, some sleeping mats, and an oven (I made a glitch furnace using MCEdit).
I didn' show the furnace in the above image, so this is the furnace in case you were curious.
As you can see, the Tile Data of the furnace is improperly set, so the furnace appears to be lit, but in the GUI, the furnace is indicated to be inactive. (Hey, I got to kill two birds with one stone, and show you guys my Furnace GUI texture! :D )
Religion was very important to the Aztecs, so each room in each house has a shrine. But, since Minecraft doesn't have many options for blocks for the shrines, they ended up looking kind of ridiculous.
Another common house feature was a steambath. The doctors found them to be healthy, so many people had them built outside their homes.
The Steambaths are actually quite simple! They would light a fire inside, then pour water on the wall to heat it up, so I added a fireplace, even though it really doesn't help in Minecraft. Well, if you're going to do something, you may as well do it the way it's meant to be done: in my case, with a fireplace!
I used some cobwebs to make pretend steam. I saw this on a video somewhere. Why not make a spider's day for a change? :D
Um, yeah...
Next up, we have a more unusual lot: a Chinampa, AKA Floating Farm!
These things are literally a farm floating on a lake. The Ancient Aztecs used to lay down lake mud on a lake, and grow willow trees on it, so the roots of the trees would quickly grow and hold together the farm bed.
I did try to build some small Willow trees. Hand-crafted plants are sort of a lost art in this game.
This house is quite crammed! But still, religion was important enough to the Aztecs that they would always have a shrine.
In here, there is some storage. I'm not sure if they actually had something like this storage room, but none of the web sources I could find had any details on what they would build on the Chinampas, so this was my best guess. Also, a guy has to keep his tools somewhere, and you know me and how I am a chestaholic, and this is the result.
Finally, here is the Noble's House. I'm right in front of the entracne.
Once again, I couldn't find any specific information on the architecture of the homes of the Nobles, so this house is largely based on a Mexican house I've seen before.
Anyway, here are the rooms! I didn't want to do too long of a post today, so down below are pictures of all the unique* rooms. Here we go!
But first, let's call it time for the Impromptu Random Bonus Screenshot of the Week!
In today's photo, we have a very random Spider Jockey.
My caption: that awkward moment when a Spider Jockey holding an enchanted bow decides to climb into your back window...
First of all, heading to the right at the front entrance, we have the dining room. Yes, the Aztecs actually would sit on blocks of stone.<3
Next room down the right side of the house is the Kitchen.
Last on this end of the house are the servant quarters. The Nobles did have several servants!
We have reached the end of that part of the house, so let's head down the other end.
Immediately to the left are the Men's and Women's Reception Rooms (they appear in that order, going down the left stretch). This is where the residents would entertain their guests!
Right after that, we hit the master bedroom...
...and then *a whole TON of minor bedrooms! This is only one photo! XP <- (Dead face)
Down below, all the orange-highlighted area is filled with bedrooms.
The final room on this end of the house is a nursery. (Yes. The crib may be horribly historically inaccurate. :p)
Last but far from least, we have the outdoor garden! Here it is, along with the Wacky Water God! (Remember him? :) )
Well, that's it for this week. If you have any suggestions, I would really appreciate them, and thanks for stopping by my blog!
I'll see you all next post Until then!
Saturday, March 15, 2014
A Brief YouTube Channel Update
Hello, I'm N8thanH, and welcome back to Across the Map.
Today is not the weekly post, but rather, I am using my blog for a platform for a channel update. I think I can explain best here, since I am not the greatest speaker. Here goes...
Firstly, I promise that I AM working on the channel. I'm drawing some channel art, but you know what they say; you can't rush perfection. It should be done sometime soon, but it's hard to find time to work on it. For the cause of maybe getting some feedback, here is a little preview. (Don't mind the floating pants patterns. By the way, I bet you can't guess what pattern is on my pants! Free shot-out to the first person that does! ;) ) Come to think of it, I only really have to draw my "Lavarai" form!

Once that is done, and I have a background and more professional profile picture, (will be derived from the channel art) I plan on getting into a nice posting routine, like I have been trying to get into here. Expect a post this Tuesday, by the way!
In other news, Fire_Cat2000 and I have been working on getting the Tutorial series going together. We plan on releasing the first 3 episodes in a pack. Short reason, so new players don't get killed on day 2. Longer answer, because it doesn't seem smart to send players out on their second morning without knowing how to fight, or knowing how food is vital.
At the time of this writing, it's Saturday morning. I will hopefully get some recording and editing done over the weekend. You can expect an LP episode, but it is quite old. I'll admit it now.
Okay. That is about all I have to mention for now, and my Windows 8 laptop wants to update in 15 minutes, so I'd best let it do that. Sorry if I disappointed you if you were expecting the weekly post.
As always, I need nothing more than your feedback. Thanks for your support, my 7 subscribers, and I'll see you all next time. Until then!
Today is not the weekly post, but rather, I am using my blog for a platform for a channel update. I think I can explain best here, since I am not the greatest speaker. Here goes...
Firstly, I promise that I AM working on the channel. I'm drawing some channel art, but you know what they say; you can't rush perfection. It should be done sometime soon, but it's hard to find time to work on it. For the cause of maybe getting some feedback, here is a little preview. (Don't mind the floating pants patterns. By the way, I bet you can't guess what pattern is on my pants! Free shot-out to the first person that does! ;) ) Come to think of it, I only really have to draw my "Lavarai" form!
Once that is done, and I have a background and more professional profile picture, (will be derived from the channel art) I plan on getting into a nice posting routine, like I have been trying to get into here. Expect a post this Tuesday, by the way!
In other news, Fire_Cat2000 and I have been working on getting the Tutorial series going together. We plan on releasing the first 3 episodes in a pack. Short reason, so new players don't get killed on day 2. Longer answer, because it doesn't seem smart to send players out on their second morning without knowing how to fight, or knowing how food is vital.
At the time of this writing, it's Saturday morning. I will hopefully get some recording and editing done over the weekend. You can expect an LP episode, but it is quite old. I'll admit it now.
Okay. That is about all I have to mention for now, and my Windows 8 laptop wants to update in 15 minutes, so I'd best let it do that. Sorry if I disappointed you if you were expecting the weekly post.
As always, I need nothing more than your feedback. Thanks for your support, my 7 subscribers, and I'll see you all next time. Until then!
Tuesday, March 11, 2014
N8thanH's Nether Travel Guide - The Hidden Code of the Nether
Hello, I'm N8thanH, and welcome back to Across the Map!
As most of us know, the Nether, being a cavern, is one of the most elaborate, thus confusing locations in Minecraft, and I know that almost all of the players on Bluestrike tend to get lost while wandering the infernal caverns of the Nether.
So, today, I am going to teach you all about Nether navigation, in the form of a travel guide! So, let's get to it!
Packing up
The first step for any successful travel is to pack the right items. When it comes to Minecraft, having the right or wrong equipment can either make a bad situation better or worse, respectively. Therefore, let's head to our bases, and get ready!
I realize that not everyone is at the same point in their worlds, so this part of the blog post will be designed to address everyone, at every point. Well, except for players doing Nether Survival Challenges. Sorry guys.
As this guide will be done on Bluestrike, here I am at my forest house, to gear up to go terrain spotting!

First of all, here is my current inventory as it stands. I haven't been doing anything special, so this is my typical inventory:
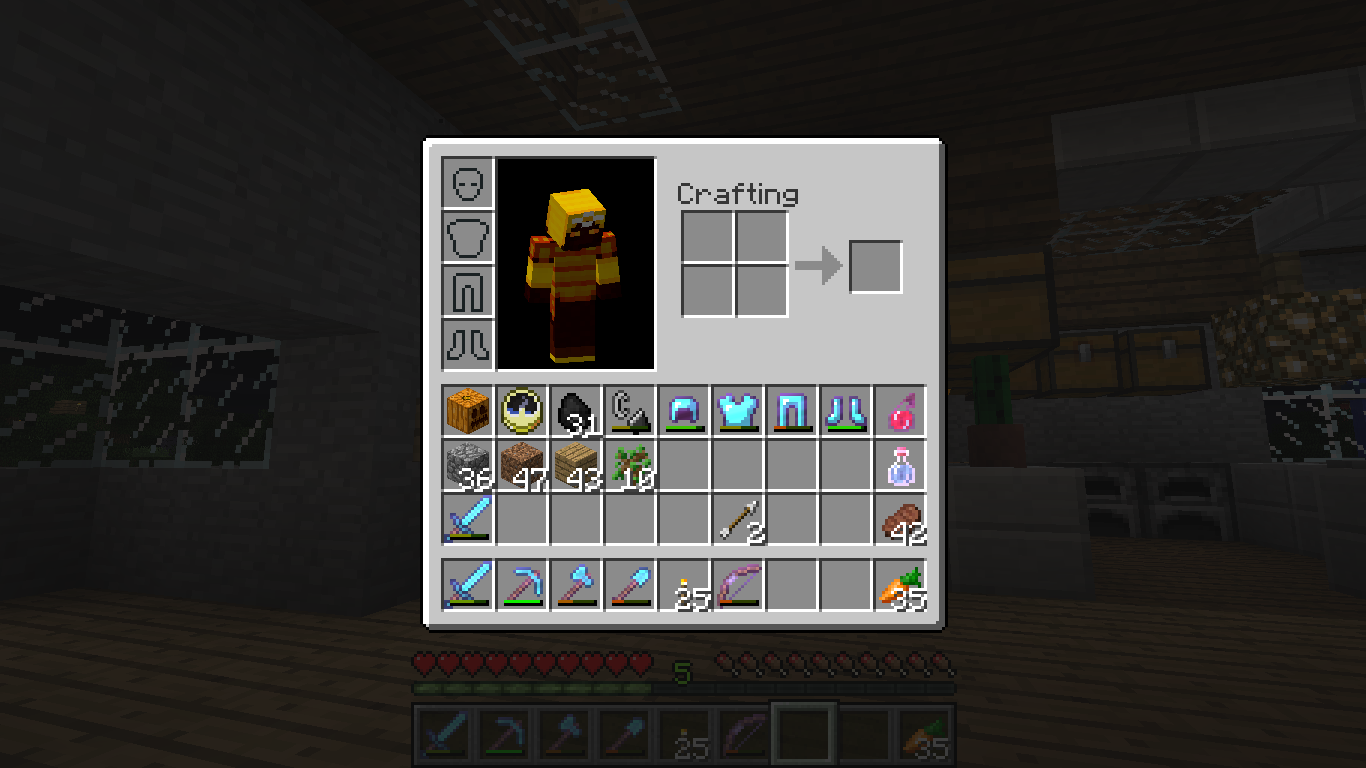
- Pumpkin Hat for fighting Endermen
- Clock for keeping an eye on the time
- Coal for making torches
- Potions for their respective uses
- Flint and Steel for fire-cooking meat
- Planks for crafting on the go
- Cobblestone for building around
- Dirt for landscaping and growing trees
- Saplings for replanting trees or growing if bad comes to worse
There are no Endermen in the Nether, and clocks don't work there, so we can pretty much knock these items off immediately.

I don't foresee myself using my shovel or axe... But, the thing with the axe is that I could need it, but if I were to die, I could lose my favorite axe for no reason. Plus, if it comes to harvesting trees, I can always make a stone axe; I will bring my wood and cobblestone!

As for the diamond sword and pickaxe, whether you bring them or not really depends on what your wealth in diamonds is like. In my case, I really can afford to lose my tools. This is why:

If that isn't practically what you see when you gaze into your loot chest, I would recommend putting away your pickaxe, perhaps. After all, Netherrack is easy enough to mine! In fact, Efficiency IV Diamond Pickaxes are kind of hard to control on Netherrack.
Don't forget to load up on Cobblestone! It is your best defense against the ghastly ghast fireballs!

If you have managed to go on past Nether outings, and are into brewing, it wouldn't hurt to grab some Potions of Fire Resistance; if you are feeling clumsy, they could save your life! Splash or drinkable? Your preference: Quick on the draw, or super reliable? Personally, I would recommend the drinkable ones.

For the sake of our favorite mining tool, let's call it International Save the Pickaxes Day, and use the old gravel elevator, instead of carving long staircases with our poor pickaxes! In that case, grab a shovel or two. Iron should do us good, but a backup may be in order.

Alternatively, if you have a lot of Ender Pearls, you can bring some of those.
Also, if you have done high-level enchanting, I would suggest bringing an Ender Chest with a Silk Touch pick inside, if you wish to have more inventory space. Just remember to put away any items you were delivering to other places. (I'll just keep that Neptune inc. Coupon there, just in case... ;) )

In conclusion, here is my final inventory!

Nether Navigation
Awesome! Now that you're packed up, allow me to guide you through the caverns of the Nether!
How are we going to do that, you ask? By doing this oldschool Minecraft adventuring style!
Imagine you are playing early Minecraft Alpha- or late Infdev, before the introduction of biomes. Extreme Hills-like mountains can be seen almost everywhere you go, safe for small islands, and plains-like areas. Bottom line, biomes aren't there to aid you in your navigation, but hills are sure at large! What do you do?
If you know what I'm talking about, and have an idea of how you would navigate the consistently consistent landscapes of pre-biome infinite worlds, then I suggest you try it here; the features of the Nether do kind of represent the feature set of early infinite maps...
- The oceans/bays that were fairly common - the lava seas that you see almost everywhere at layer 30
- The trees that occasionally dot plains-like areas - Glowstone formations (one good reason to leave them partially intact)
- Your typical mountains <3 - Cliffs, overhangs, and other notable landforms in the Nether

For instance, in this picture, I see a usual bay, some islands in it, some mountains in the very background, and an interesting tree far off to my right!
See?? You have all the things you need to look out for in the old Overworld, in the Nether!
See it in Action
Maybe that wasn't nearly specific enough. Yes, I thought you might say so. In that case, I'll go on a mini adventure to show you how to navigate effectively.
First of all, I just wanted to show you guys this, before I head too far from my portal. It's a little beacon, pointing toward home! Have you heard of the (excuse my potentially bad spelling, but...) Inukshuks that the Inuit People would build to navigate the arctic terrain? We are in a situation that isn't that different, so I opted to build these as I go. Let's face it, nobody can navigate the Nether entirely without these.
My system with them is that the direction I will come home from is being pointed to from the short end, implemented because not using a point-where-you-came-from bit got me lost in a tundra once. (Newbie Adventures in the Tundra of Stardust. :D ) (Mind you, I was using the "long end" to point toward the Taiga Biome I was trying to reach.) On these markers, the long end points towards my portal home. It's the real important end.

Alright! For this example adventure, I think I'll go down this way. I don't think can really see the example beacon I made last screenshot from below, so I built another.

I gravel pillared down. To know precisely where to pillar jump back up, I also left these blocks. (Don't mind the cobblestone bridges. Someone built them one time. Not the safest way to travel the caverns. >.>)

If the caverns are really that plain, lava falls work in a pinch. However, every once in a while, you come across an epic lava fall that fell over a steep cliff. Those falls are as good, if not better than any terrain feature you can find!

I'm sure I have taken a screenshot of one somewhere... Bingo! I knew I had an awesome lava fall picture somewhere! Only, it uses my texture pack, and smooth lighting appears to be disabled. Oh, well. The fall is still awesome! :D

I continued on, and found this Nether fortress. It's not ideal, but I say we explore it a bit! I think I can remember this cavern as being my exit.

By the way, just a tip: It's time once again for the Impromptu Random Bonus Screenshot of the Day! (Man, I've missed doing that!)
Today's silly photo is a seriously stretched picture of my Nirikon Forest home. (Sorry if this picture is rather old, it's the best I've got! Just roll with it, please.)

As usual, my caption: For the first time ever, Weird Corporation inc. presents the Elasti-House! Room too low? Stretch it up! No room for your guest? Punch out a room yourself! For a limited time only*!
(By "limited time only," we are referring to what you do to your house. By that, we mean it punches you back after about 3 seconds.)
Anyway, nonsense aside, I really do have some advice. The tip was: if you come across one of these small pocket areas, make sure to take careful note of it. Otherwise, you may have a hard time finding it again.

Getting back to my adventure, the last thing I did was place this torch marker that I use in mineshafts sometimes, so I will know which staircase to take. Again, the goal is to not end up wandering around, looking for our portal home.

Somewhat unlike abandoned mineshafts, Nether Fortresses have a bit more variation in structure. For instance, these little Blaze Spawner balconies stand out, because they don't look like anything else in the fortresses, and there are only 2 per.

Let's pretend right here that I am not sure where I went, exactly. Ahead of me and to my left are two small staircase rooms, that look exactly the same. But, I'm pretty sure I need to head East.

This is confirmed by the fact that the East staircase has my torch marker...
...While the one to my side does not!

Now, from here, I headed East some more, and look! It's a marker! I need to go down there!

The marker points down this cavern. Hopefully I am where I think I am.

As I wander through this open cavern, I find yet another marker. We aren't far from home, now!

This is where I genuinely needed the markers; up there on the ledge. I have gotten confused by the height of where my staircase is before. I always seem to think it's a level lower than it is, and opt to use the bridges. But, the markers confirm that home is up there.

All that's left to do now, is to pillar back up. In retrospect, maybe I should had just used cobblestone, and reclaimed the gravel.


At last, we're home safe! Yay! :D

Ah, after my travels, my fiery eyes are adjusting to the sunlight, and my rocky skin is adapting to the humidity swing... I'm home.

On that note, this concludes my Nether Travel Guide. I hope it's helpful to you, but as always I'm open to feedback, and will gladly add anything you need to know to this post. But for now, I'll see you next one. Until then!
Saturday, March 1, 2014
Japanese Garden Expantion into Nirikon Forest - Path and Rocks/Rock Gardens
Hello, I'm N8thanH, presenting myself to you in a freshly-armored, and appropriate form of a Magma Slime Samurai (sorry for the run-on sentence (I know this apology isn't helping)), and *pant pant* welcome back to Across the Map. (Phew!)
So, here is the story: If you remember from quite a while ago, I built a this traditional-style Japanese house, as seen behind me, along with a garden in the back. (That was actually the second most (if not most) popular post on my blog!)

Now, after visiting an authentic Japanese Forest Garden, studying Japan some more, and even reading a magazine article that coincidentally happened to be a thing, I was inspired to renovate parts of my forest home, Nirikon Forest into my own style of Japanese garden!
For the most part, I will be (trying to) build the garden the way it would have been traditionally, but with accommodations for the needs of a Minecraft base. Without furtheradieu stalling, relax your mind, and follow my steps through this mini-series, if you wish to build a Japanese garden too.
Here are some screenshots of the forest so far, just so we are closer to being on the same page. I would show you guys some older photos, but the only ones I could find were so old, they were basically irrelevant. They had to be at least a year and a half old!
Day


Night


Okay. Now that that is over with, allow me to begin!
Step 1: Picking your Color Scheme and Garden Theme
Japanese gardens are created as smaller, ideal slices of nature. Before we choose the plants, we need to figure out what our garden will represent. This one is really up to you! Like usual, just be creative, and come up with something new.
Personally, I decided to choose a forest after rainfall, with clean-looking rocks, mushrooms growing in theoretically damp places, trees that look sort of weighed-down, small plants planted as if they decided to pop up over night, and small pools.
The second part of this step is more or less self-explanatory. In Japanese gardens, all the plants usually follow one color scheme. So, right now, we need to consider the natural colors that are/will be around us, and choose colors that can go with them. Here is my example:
Color: - In the area: - Therefore:
For that reason, I also plan on using local trees; various Birch Trees, and a few Jungle and Spruce Trees. (Before 1.7 added more, I actually had every tree type in existence in a biome adjacent to my forest.) Note that when planning tree types, irregularly shaped trees are generally best, as asymmetry is a goal in these gardens.
So, in conclusion, we will have Ferns, Blue Orchids, Mushrooms, Azure Bluets, and Poppies for plants, and red, brown, and cream for the occasional colored rocks, but I have used other rocks in the rock gardens.
Step 2: The Central Path (Bases Only)
No, I do realize that this is probably not when you build a path in normal garden development. But, in my case, this forest is not just a forest, it's also my base, and where I call home, for the most part. Therefore, the forest still has to continue to do its job of supporting me as a player (and maybe wrecking one of my friends' day ;) (not like anyone really comes on anymore (but I can wish! (This is getting ridiculous :p (no, I know, not helping the casuse once again. (Okay, okay. I'll just be quiet now.)))) :( )).
Unnecessary ramblings aside, that is why I chose to make the path first; so they would be at their most convenience; going directly to the buildings, and I will know what to build the garden around.
But, before you go building your path, you'll want to come up with the blocks you use for it. So here are some questions that I came up with for you to ask yourself.
1. What blocks have you been building with in your base?
2. What colors do you plan on using for the garden? (See above paragraph)
After making a color sample:
3. Choose which one will be the border, and which one will be on the inside of it. For the sake of not having your base visitors get lost, the border should be noticeable, but not too outstanding.
Step 3: Rocks and Rock Patches
Rocks in Japanese gardens represent permanence, and are placed to look like they were always there.
But, they are also chosen the same way a sculpture or statue would be in a western garden.
Lucky patterns are another common goal; opposites meeting, (Yin and Yang; they are opposites, but complement and complete each other) and anything you believe seems lucky is most likely a good idea to incorporate!
So, you can place your rocks as you choose; placing them wherever and in whatever shape they feel lucky/right. Just don't add too many, but however many that is is sort of situational.
In the rock gardens, rocks take on a somewhat different role: representing islands in the sea (as represented by sand or gravel). I admit to not knowing what I was doing, so I came up with the idea of making various small rock "patches," which I arranged to hold different ideas.


I didn't think anyone would get the messages, so I added signs by the rock gardens, with their respective messages. Meh, it makes me seem all the wiser. :p
You guys just go to town, but first, here is how to build a garden, in a few quick steps:
1. Make a bed of sand or gravel (whichever you favor for all your gardens)
2. Place the rocks
3.Pick a block that looks similar to your sand/gravel. Draw patterns with it.
Well, that's all I have to show and teach for today. As always, feedback is appreciated, and thanks for stopping by my blog! I'll see you all next post. Until then!
 |
So, here is the story: If you remember from quite a while ago, I built a this traditional-style Japanese house, as seen behind me, along with a garden in the back. (That was actually the second most (if not most) popular post on my blog!)
Now, after visiting an authentic Japanese Forest Garden, studying Japan some more, and even reading a magazine article that coincidentally happened to be a thing, I was inspired to renovate parts of my forest home, Nirikon Forest into my own style of Japanese garden!
For the most part, I will be (trying to) build the garden the way it would have been traditionally, but with accommodations for the needs of a Minecraft base. Without further
Here are some screenshots of the forest so far, just so we are closer to being on the same page. I would show you guys some older photos, but the only ones I could find were so old, they were basically irrelevant. They had to be at least a year and a half old!
Day
Okay. Now that that is over with, allow me to begin!
Step 1: Picking your Color Scheme and Garden Theme
Japanese gardens are created as smaller, ideal slices of nature. Before we choose the plants, we need to figure out what our garden will represent. This one is really up to you! Like usual, just be creative, and come up with something new.
Personally, I decided to choose a forest after rainfall, with clean-looking rocks, mushrooms growing in theoretically damp places, trees that look sort of weighed-down, small plants planted as if they decided to pop up over night, and small pools.
The second part of this step is more or less self-explanatory. In Japanese gardens, all the plants usually follow one color scheme. So, right now, we need to consider the natural colors that are/will be around us, and choose colors that can go with them. Here is my example:
Color: - In the area: - Therefore:
- Gray/White: birch wood, mushroom stems; gravel + rock in Zen Gardens, gray rocks, azure bluets
- Red: red mushrooms, poppies; red stones, poppies (Rock Gardens)
- Brown: woods, soil; brown stones, cocoa beans
- Blue: water, nearby swamp; blue orchids
For that reason, I also plan on using local trees; various Birch Trees, and a few Jungle and Spruce Trees. (Before 1.7 added more, I actually had every tree type in existence in a biome adjacent to my forest.) Note that when planning tree types, irregularly shaped trees are generally best, as asymmetry is a goal in these gardens.
So, in conclusion, we will have Ferns, Blue Orchids, Mushrooms, Azure Bluets, and Poppies for plants, and red, brown, and cream for the occasional colored rocks, but I have used other rocks in the rock gardens.
Step 2: The Central Path (Bases Only)
No, I do realize that this is probably not when you build a path in normal garden development. But, in my case, this forest is not just a forest, it's also my base, and where I call home, for the most part. Therefore, the forest still has to continue to do its job of supporting me as a player (and maybe wrecking one of my friends' day ;) (not like anyone really comes on anymore (but I can wish! (This is getting ridiculous :p (no, I know, not helping the casuse once again. (Okay, okay. I'll just be quiet now.)))) :( )).
Unnecessary ramblings aside, that is why I chose to make the path first; so they would be at their most convenience; going directly to the buildings, and I will know what to build the garden around.
But, before you go building your path, you'll want to come up with the blocks you use for it. So here are some questions that I came up with for you to ask yourself.
1. What blocks have you been building with in your base?
2. What colors do you plan on using for the garden? (See above paragraph)
After making a color sample:
3. Choose which one will be the border, and which one will be on the inside of it. For the sake of not having your base visitors get lost, the border should be noticeable, but not too outstanding.
Step 3: Rocks and Rock Patches
Rocks in Japanese gardens represent permanence, and are placed to look like they were always there.
But, they are also chosen the same way a sculpture or statue would be in a western garden.
Lucky patterns are another common goal; opposites meeting, (Yin and Yang; they are opposites, but complement and complete each other) and anything you believe seems lucky is most likely a good idea to incorporate!
So, you can place your rocks as you choose; placing them wherever and in whatever shape they feel lucky/right. Just don't add too many, but however many that is is sort of situational.
In the rock gardens, rocks take on a somewhat different role: representing islands in the sea (as represented by sand or gravel). I admit to not knowing what I was doing, so I came up with the idea of making various small rock "patches," which I arranged to hold different ideas.
I didn't think anyone would get the messages, so I added signs by the rock gardens, with their respective messages. Meh, it makes me seem all the wiser. :p
You guys just go to town, but first, here is how to build a garden, in a few quick steps:
1. Make a bed of sand or gravel (whichever you favor for all your gardens)
2. Place the rocks
3.Pick a block that looks similar to your sand/gravel. Draw patterns with it.
Well, that's all I have to show and teach for today. As always, feedback is appreciated, and thanks for stopping by my blog! I'll see you all next post. Until then!
Subscribe to:
Posts (Atom)
\8D/

My ever-changing Minecraft skin...
Fire_Cat2000's Blogs
-
Brown Paper Bag Owl Craft - Fire_Cat Here!! And welcome back to another post. Today we will be making... This Cutie!!! This Brown Paperbag Owl craft is easy to make and fun. Let's ...

-
More Food "Monday" # 3 - Pancakes - Fire_Cat Here! And welcome back to More Food Monday. (Wellllll, Tuesday.) On today's menu are... Pancakes!! Let's get started! First step, put togethe...

Post a Comment