Tuesday, October 8, 2013
Building Showcase - Modern House
Hello, I'm N8thanH, and welcome back to Across the Map, and today, I am going to show you a modern-style house I built, just for inspiration.
This house is mostly meant to be built on a Survival Multiplayer server, for 2 players. This house is indeed capable of hosting company comfortably!
So, like any good tour, how about we get things started by taking a look at the front of the house?
Here it is. As you can tell, this house's second floor is incorporated into the roof, which is why the roof is so tall. Otherwise, the ceiling would be super low. I also put some fern gardens and birch trees throughout the property. I think they complement the house nicely!

Let's head inside, now. I think that sounds good!
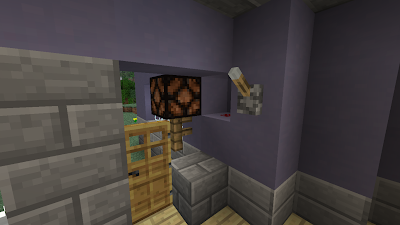
Here is the entrance, from the inside. There is a closet, too, because it is always helpful to have chests in convenient places. I also wanted to point something out, just in case you are in a similar situation: do you see that lever? I did a little bit of sneaky wiring that I wanted to show you.

I temporarily removed some blocks to show you what I did. I didn't like how the lever looked when attached to the Stone Brick door frame, so I found a way to hide a piece of Redstone inside the wall! It powers the blocks that are next to the lamp outside, and therefore indirectly powers the lamp! For more help with doing this, I'd recommend looking for a basic Redstone tutorial.
Continuing on, here is the rest of the main floor!
Right in front of you is the dining table. In front and slightly to the left is the kitchen, and in the very back is the breakfast nook. Through those doors is the living room, but we'll get to that in just a moment.
Oh, and I'd like to point out that board on the wall, next to the staircase. It is a task list, so you could write down your tasks! It is meant to simulate a chalk board. Also, I put a scratch chest below it, so you can toss items you no longer need in it, to be sorted later (because full inventories are disorganized and annoying), and pick up ones you need instead.

Here is a better look at the breakfast nook and the kitchen. I used the stair blocks for the counter so I could sneak some chests in underneath them. They are lit by Redstone Torches, just in case you were wondering. The black was kind of bothering me.
(If you are trying the torch trick too, but it isn't working, try removing some blocks next to the chest. That is what worked for me.)
The amount of storage space in the kitchen is probably overkill (as with many things in this house :p ), but I also added some chests as cupboards, simply because they look good. Gotta please your eyes, after all! Rules to live by when building. :D

(Tip #1: finding it hard to get enough furnaces in the kitchen for it to be very functional? Try double ovens!)
Getting back to the living room, here it is.
Tip #2: always give the furniture you want the space you need. In other words, never let something feel cramped, and if it does, expand the walls to accommodate! Even better, try to plan out where everything will go with dirt blocks when you first lay out where the walls will be. Also make sure that everything is given the proper space.

Moving right along, let's head upstairs.

So, to our immediate right is the storage room, which I will get to in a moment. Right up ahead is the master bedroom. Shall we take a look inside the two rooms?

Since it is first up down the hall, here is the storage room.
Tip #3: if you have a large amount of chests in one place, always use trapped chests to put chests right next to each other.
Anyways, here is the master bedroom.
It is always tricky to get everything to fit into a second floor; especially one like this. So, I'd recommend to beginner builders to do a more normal upstairs before trying this kind. I probably make it look easy, but I have skills in this game that have developed over the course of almost 3 years.

Here is the rest of the hallway. We will be going through that door on the right.

Anyways, our second-to-last room: the extra bedroom. My only thought on it is that I probably would have added more bedrooms if I could have, but it simply didn't end up working out. Well, the basement would probably work.

If you add a basement, a whole new realm of possibilities opens up. But, I didn't add one in this house, because I didn't really need it. This house was meant to be for a building challenge that Fire_Cat2000 and I were doing, where we both use roughly the same blocks, and go to town.
(Who am I kidding? The real reason is that I was mostly just too lazy.)
Alright, final stop: the office. It is right behind me in that photo of the rest of the hallway. Here it is, and there is that nice, big window you saw earlier! This room is well-equipped with more chests, (I know, right? Totally overkill!) a desk, and a couch.


And so, this concludes my tour of the house- Wait, we forgot about the backyard! Let's head out right away!
To head out, you just head out through these doors.

Here is the deck, and my little pretend barbeque. Like it?? :)

Now, here is the yard, from multiple angles!
I put a little bistro set over in the corner, where it is nice, and out of the way! There is also a tool chest in the middle of the yard, to make item retrieving convenient.
For your information, the water pool just happened to be there when I was carving into the hill. It is pretty nice, though! Hmm... a pond isn't a bad idea. Note to self...

In my opinion, embedding Glowstone into the lawn is the best way to light large yards, unless you want torches or creeper surprises. Whatever works for you.

The tour is over, but I wanted to end off this blog post with one last tip.
Tip #4: Do you like something you saw? If it fits in with your build, I highly encourage you to implement it into your build! If you are new to building, try to replicate what you saw, if you like it. It's okay if it doesn't end up looking all that good, or you don't manage to pull it off. Just chill out, and try it again next time it seems fit. You gotta keep on improving!
So, this concludes today's Building Showcase. As always, feedback is appreciated, and thanks for reading!
I'll see you all next post. Until then!
This house is mostly meant to be built on a Survival Multiplayer server, for 2 players. This house is indeed capable of hosting company comfortably!
So, like any good tour, how about we get things started by taking a look at the front of the house?
Here it is. As you can tell, this house's second floor is incorporated into the roof, which is why the roof is so tall. Otherwise, the ceiling would be super low. I also put some fern gardens and birch trees throughout the property. I think they complement the house nicely!

Let's head inside, now. I think that sounds good!
Here is the entrance, from the inside. There is a closet, too, because it is always helpful to have chests in convenient places. I also wanted to point something out, just in case you are in a similar situation: do you see that lever? I did a little bit of sneaky wiring that I wanted to show you.

I temporarily removed some blocks to show you what I did. I didn't like how the lever looked when attached to the Stone Brick door frame, so I found a way to hide a piece of Redstone inside the wall! It powers the blocks that are next to the lamp outside, and therefore indirectly powers the lamp! For more help with doing this, I'd recommend looking for a basic Redstone tutorial.

Continuing on, here is the rest of the main floor!
Right in front of you is the dining table. In front and slightly to the left is the kitchen, and in the very back is the breakfast nook. Through those doors is the living room, but we'll get to that in just a moment.
Oh, and I'd like to point out that board on the wall, next to the staircase. It is a task list, so you could write down your tasks! It is meant to simulate a chalk board. Also, I put a scratch chest below it, so you can toss items you no longer need in it, to be sorted later (because full inventories are disorganized and annoying), and pick up ones you need instead.

Here is a better look at the breakfast nook and the kitchen. I used the stair blocks for the counter so I could sneak some chests in underneath them. They are lit by Redstone Torches, just in case you were wondering. The black was kind of bothering me.
(If you are trying the torch trick too, but it isn't working, try removing some blocks next to the chest. That is what worked for me.)
The amount of storage space in the kitchen is probably overkill (as with many things in this house :p ), but I also added some chests as cupboards, simply because they look good. Gotta please your eyes, after all! Rules to live by when building. :D

(Tip #1: finding it hard to get enough furnaces in the kitchen for it to be very functional? Try double ovens!)
Getting back to the living room, here it is.
Tip #2: always give the furniture you want the space you need. In other words, never let something feel cramped, and if it does, expand the walls to accommodate! Even better, try to plan out where everything will go with dirt blocks when you first lay out where the walls will be. Also make sure that everything is given the proper space.

Moving right along, let's head upstairs.

So, to our immediate right is the storage room, which I will get to in a moment. Right up ahead is the master bedroom. Shall we take a look inside the two rooms?

Since it is first up down the hall, here is the storage room.
Tip #3: if you have a large amount of chests in one place, always use trapped chests to put chests right next to each other.
Anyways, here is the master bedroom.
It is always tricky to get everything to fit into a second floor; especially one like this. So, I'd recommend to beginner builders to do a more normal upstairs before trying this kind. I probably make it look easy, but I have skills in this game that have developed over the course of almost 3 years.

Here is the rest of the hallway. We will be going through that door on the right.

Anyways, our second-to-last room: the extra bedroom. My only thought on it is that I probably would have added more bedrooms if I could have, but it simply didn't end up working out. Well, the basement would probably work.

If you add a basement, a whole new realm of possibilities opens up. But, I didn't add one in this house, because I didn't really need it. This house was meant to be for a building challenge that Fire_Cat2000 and I were doing, where we both use roughly the same blocks, and go to town.
(Who am I kidding? The real reason is that I was mostly just too lazy.)
Alright, final stop: the office. It is right behind me in that photo of the rest of the hallway. Here it is, and there is that nice, big window you saw earlier! This room is well-equipped with more chests, (I know, right? Totally overkill!) a desk, and a couch.


And so, this concludes my tour of the house- Wait, we forgot about the backyard! Let's head out right away!
To head out, you just head out through these doors.

Here is the deck, and my little pretend barbeque. Like it?? :)

Now, here is the yard, from multiple angles!
I put a little bistro set over in the corner, where it is nice, and out of the way! There is also a tool chest in the middle of the yard, to make item retrieving convenient.
For your information, the water pool just happened to be there when I was carving into the hill. It is pretty nice, though! Hmm... a pond isn't a bad idea. Note to self...

In my opinion, embedding Glowstone into the lawn is the best way to light large yards, unless you want torches or creeper surprises. Whatever works for you.

The tour is over, but I wanted to end off this blog post with one last tip.
Tip #4: Do you like something you saw? If it fits in with your build, I highly encourage you to implement it into your build! If you are new to building, try to replicate what you saw, if you like it. It's okay if it doesn't end up looking all that good, or you don't manage to pull it off. Just chill out, and try it again next time it seems fit. You gotta keep on improving!
So, this concludes today's Building Showcase. As always, feedback is appreciated, and thanks for reading!
I'll see you all next post. Until then!
Subscribe to:
Post Comments (Atom)
\8D/
My ever-changing Minecraft skin...
Fire_Cat2000's Blogs
-
Brown Paper Bag Owl Craft - Fire_Cat Here!! And welcome back to another post. Today we will be making... This Cutie!!! This Brown Paperbag Owl craft is easy to make and fun. Let's ...

-
More Food "Monday" # 3 - Pancakes - Fire_Cat Here! And welcome back to More Food Monday. (Wellllll, Tuesday.) On today's menu are... Pancakes!! Let's get started! First step, put togethe...


0 comments:
Post a Comment